 In two previous posted blogs, I covered the topic of model sketching. The first one explored how a set of iterative sketch models—typically out of clay and at a reduced scale such as 1/32”—assisted students in defining what we call an architectural mass model. The second blog focused on the importance of creating rapid sketch models that exhibited the first unencumbered physical artifact that translated an idea—vague and amorphous as many first ideas are—into a three-dimensional object; the latter model technique emphasized the student’s intuition so often associated with a hands-on approach while crafting spatial qualities.
While drawings come in all shapes and forms and are decisive for architects in formulating and conveying ideas, there is something very powerful when ideas are manifested three-dimensionally. With physical models, there is an immediacy. To hold, look and manipulate this physical object is rewarding as it generates and satisfies our designer’s curiosity and often desire for additional change.
Model making
With iterative and rapid types of model making, I favor that they express ideas and do not simply translate two-dimensional drawings. When speaking of the importance of the conceptual dimension of a model, I emphasize to students that they be constructed from a single material, thus avoiding competing ideas that highlight specific moments of the artifact because of a variety of materials. That can be detrimental to the reading of the primary idea.
Building on these two techniques, and wanting to discuss more pointedly the issue of how a building engages on a site, I asked students to follow up on their first foray into model building—I had the previous week asked them to craft a typical model based on their drawings—by introducing a third technique of model sketching; namely one that requires the creation of an artifact (the model) solely by cutting and folding a single piece of white Bristol paper; in this case an 8 ½” x 11” sheet.
No glue, no use of different materials to express various sub-ideas about structure, glazing, or site conditions. (Typical scavenged materials that architecture students include in their models include egg crates, papier mâché, Styrofoam, wooden dowels, galvanized steel wires, two-sided colored chipboard, origami paper.) For this model, they were permitted only the occasional use of a narrow strip of scotch tape to secure where folds in the paper might resist. Seems impossible? No. Is it challenging? Of course, but let me explore how this can be done easily with some dexterity and conceptual thinking.
Paper technique
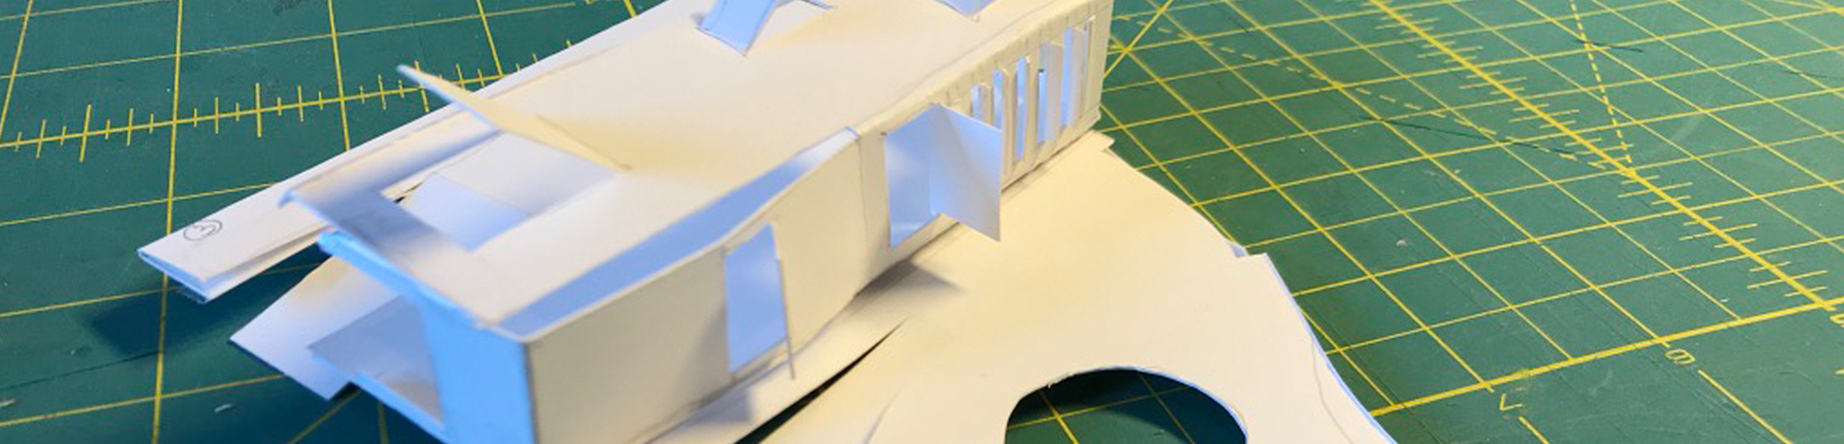
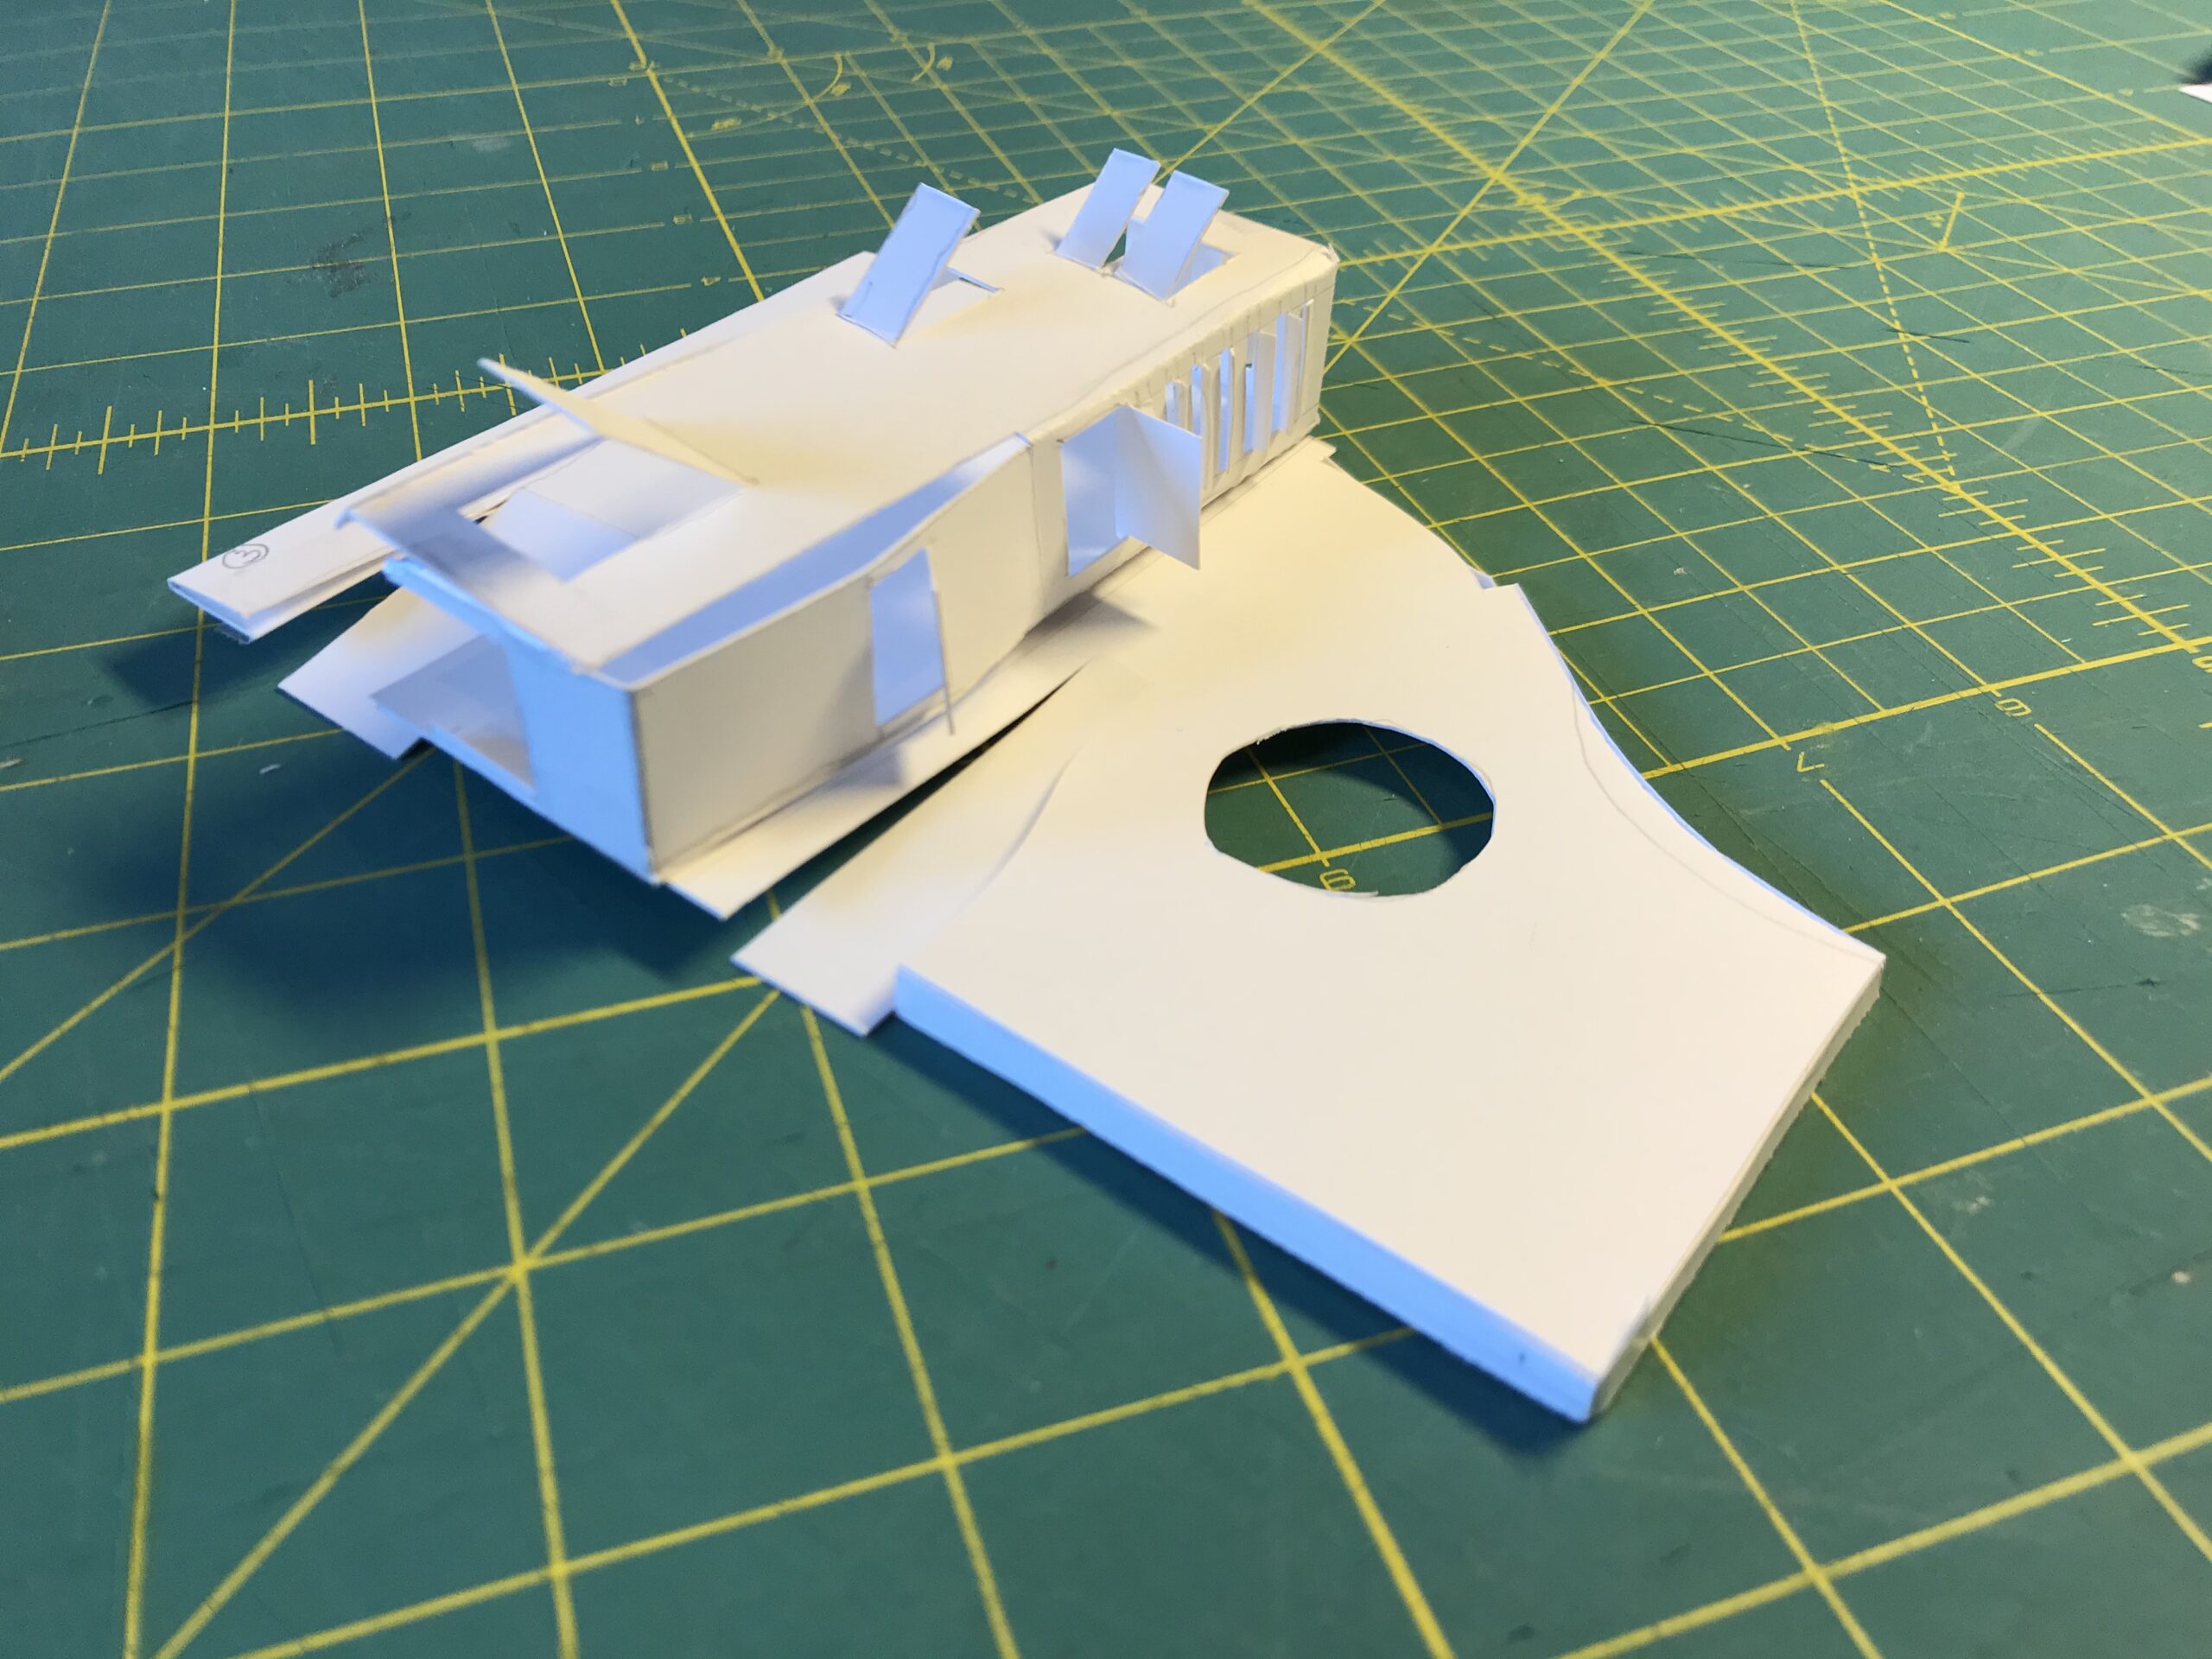 Image 1: final model out of a single piece of paper (author’s model based on a student’s project)
This method may mimic the rapid sketch model technique described in my second blog, but here the difference is that this process requires prior conceptual thinking to execute correctly.
First step
First, one needs to be strategic and anticipate spatially how this flat piece of paper will become three dimensional after a series of geometric folds and cuts. Minus the cuts, this is similar to European napkin folding or the Japanese origami where the tradition of folding is elevated to an art form resulting in finished sculptural pieces that suggest complex animals or objects. While cuts and markings are discouraged by origami masters, this particular studio exercise encouraged all three techniques of folding, cutting, and marking.
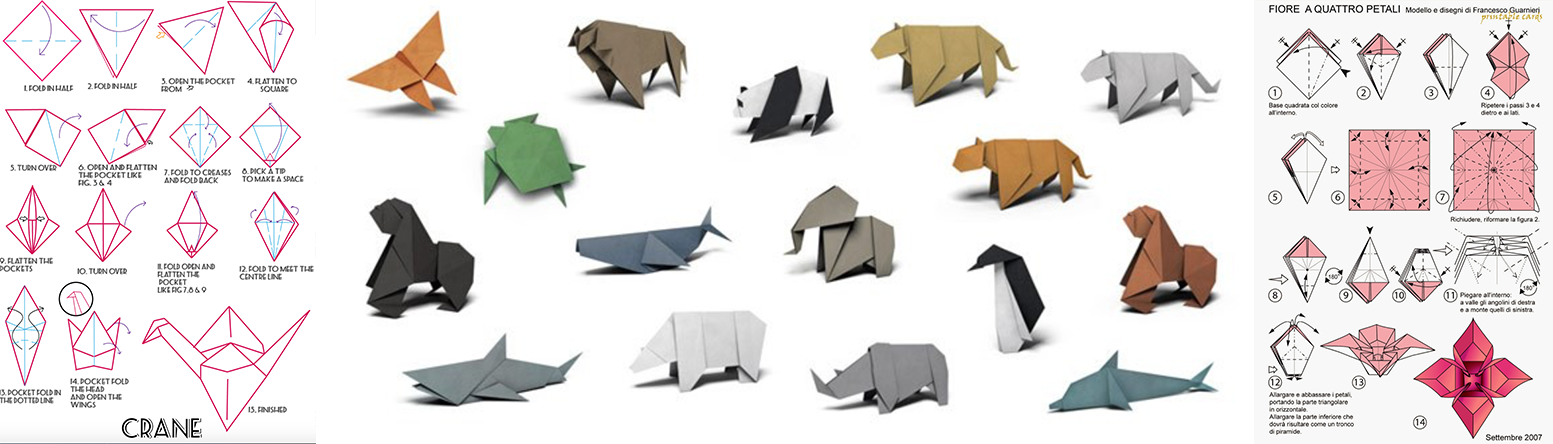 Image 2: Google -Origami templates and finished products
Second step
Second, this sketch model technique does not require any additional tools, as it emphasizes an art of making where students need to—alongside conceptual thinking—show dexterity with their hands as they fold and cut their template precisely.
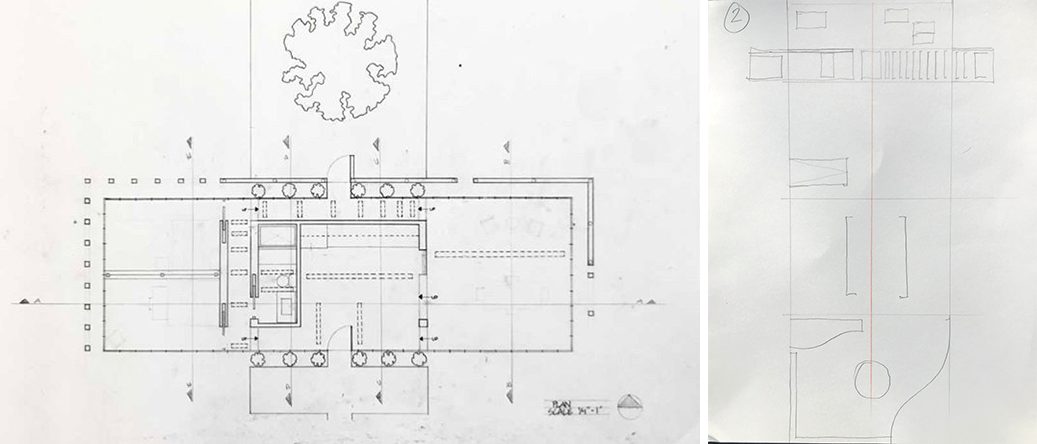 Image 3: drafted plan of the student’s pavilion; and author’s template to create the sketch model on a sheet of paper 8 1/2″ x 11″ based on the student’s plan.
Third step
Finally, contrary to most origami endeavors, there are no predetermined instructional diagrams or crease patterns that allow students to follow a series of defined folds leading to their artifact. As each of their designs are unique, students have to first envision the diagram, and, most important, the sequence in which the folds and cuts occur, so that, in our case, their “building” emerges from the site while being part of the site.
This can result in a very basic building shape, or one that incorporates complex features where the anticipation of the location of folds and cuts take place allows the creation of large or small openings in the facades, skylights on the roof, or ramps and stairs in the horizontal plane. Most importantly, this model technique aims to show unambiguously how the building engages with the site.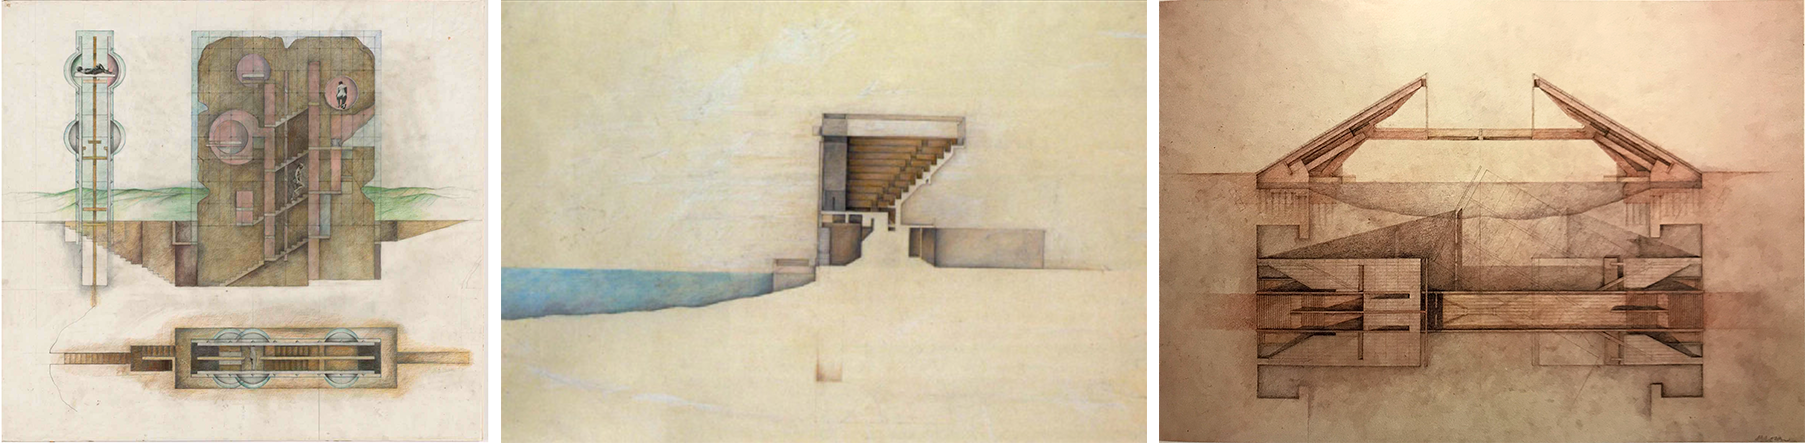 Image 4: Google -Raimund Abraham, (left) House Without Rooms (1974); (middle) Ca’ Venier dei Leoni, Guggenheim, Architecture Biennale Venice (1985); (right) Accademia-bridge, Architecture Biennale Venice (1985).
Remembering Raimund Abraham
I remember Raimund Abraham (1933-2010), faculty member at Cooper Union, insisting on showing how a building engaged a site. Having an attitude towards a topography was for him a way to express that a building emerged from the site, or that a building became the site; and one did not simply “pluck” a building on the site, which for Raimund was pure heresy. His projects—unfortunately mostly left at the conceptual and speculative level—always incorporated site conditions, either topographical, culturally, or politically (Church on the Wall, Berlin (1982-83)). Yet, in all of them the notion of a horizon was ever present as he believed that the locus of architecture held an ontological dimension between earth and sky.
Building on this fascination with Raimund’s attention to site, and having experienced the power of sketching in model form with one sheet of paper, gave me the impetus to share this strategy with my students. However, to accomplish this, students needed to have already developed a plan that expressed a basic conceptual understanding of their thesis.
In our case, students had designed a pavilion with basic functional requirements, including bedroom, kitchen and entertaining area. Yet, as we moved between scales, it became evident that students tended to focus on improving functional areas rather than continuously maintaining the conceptual integrity of their project. Needless to say, that when sections were required, site conditions had almost unilaterally disappeared, thus the need to readdress the site condition as integral to their project
Strategy
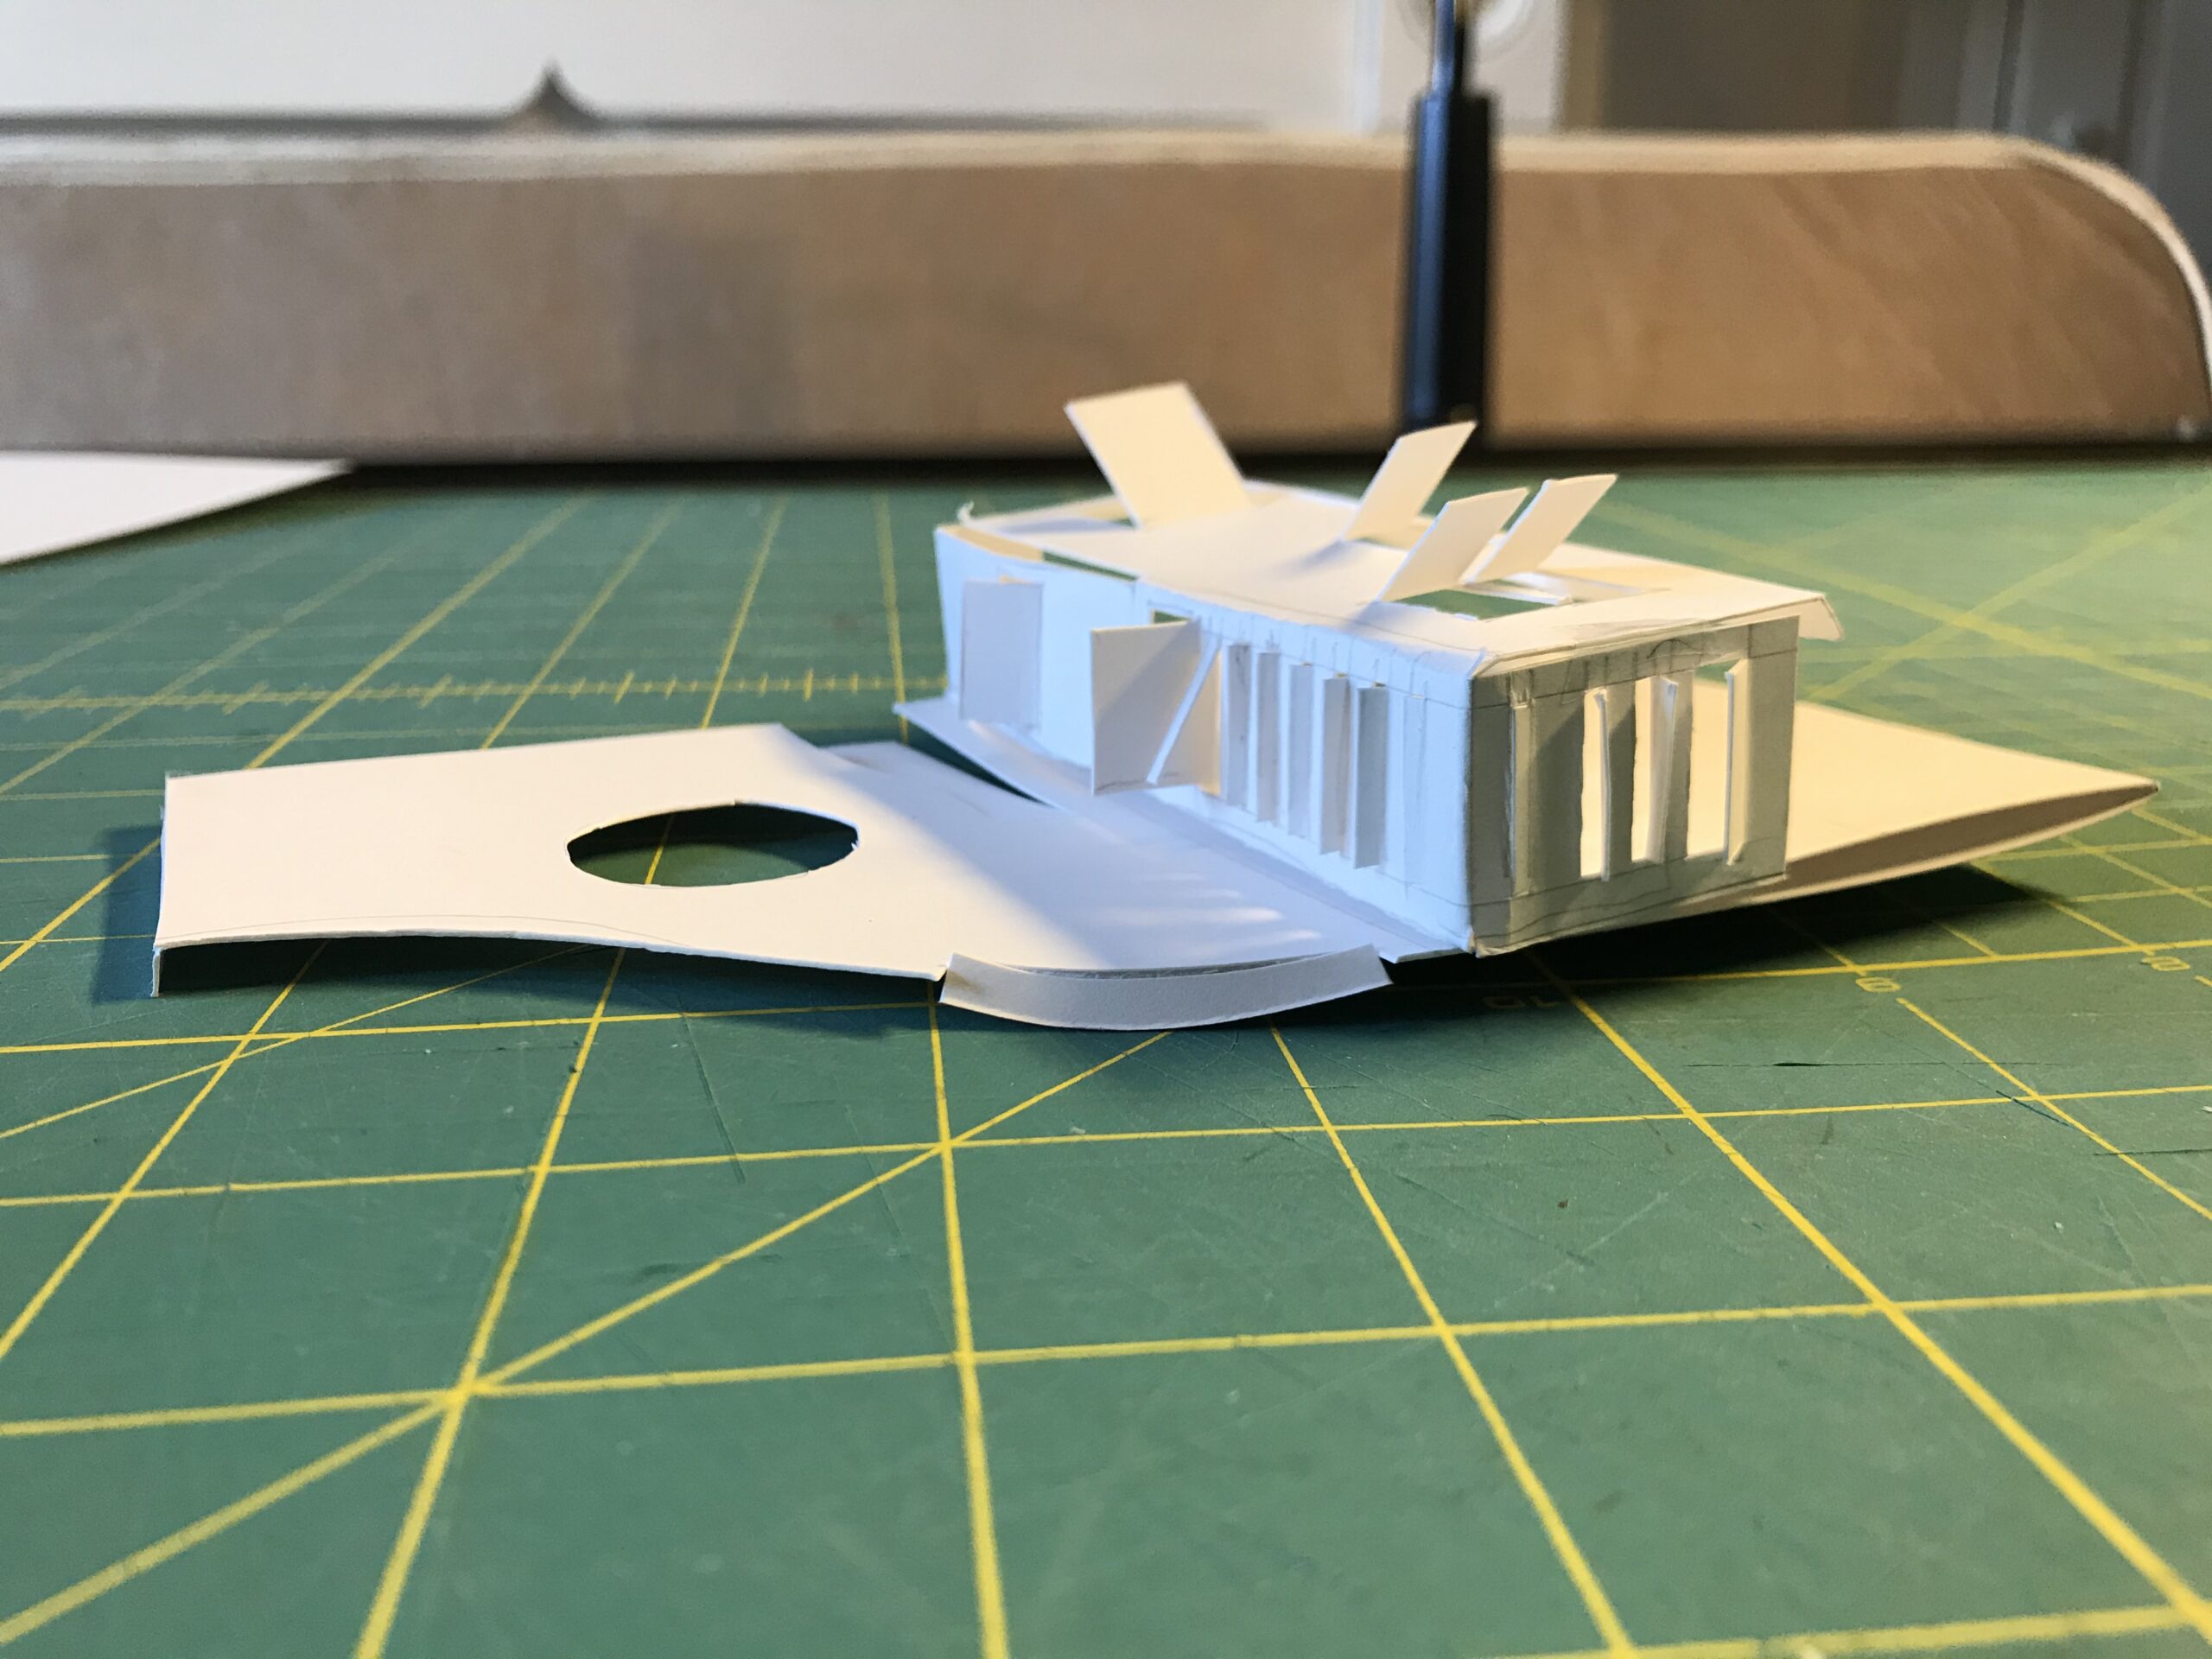 Image 5: view of the model cut from one single piece of paper (author’s model based on a student’s project)
As described in my blog Architectural Education: Questions of section. Part 2, I enjoy sharing with students various tools that will help them rapidly advance their project, rather than letting them figure out certain techniques on their own. At my current institution, many colleagues resist ever showing students how to do something under, what I perceive to be, an approach based on 18th century French philosopher Jean-Jacques Rousseau’s principle that favors the education of a student through the acceptance of human nature versus an imposition of culture on the education of its citizens.
Here, in this exercise, I feel that showing them what I mean is always revealing, as most times students have difficulty imagining that folding a single flat piece of paper can become an architectural idea, and, more importantly, when the object is presented to them, to figure out how this was done. This is particularly true when I explained that folding can become a powerful structural tool to hold their project together.
Of course, even an appreciation for the basics of this technique cannot take away our pride in wanting to make a model right the first time. Our intellectual desire for precision seems to always be confronted by the practical and useful reality of failing and redoing the model several times. Perhaps this is another way to appreciate the messy aspect of an art of making.
Recommendations
Talking this over with my students, I had a few recommendations.
- Carefully study developed plans and sections of your project. The drawings can be schematic sketches or roughly drafted as this technique is typically used in the early stages of a project and does not call for precision of particular calibration of spaces.
- Mentally establish how to fold and cut the piece of paper. This will lead to a loosely drawn up a template (instructional diagram) showing on the piece of paper what needs to happen in the crafting of the model, i.e. where folds and cuts will take place (Image 3, above right). This phase will take some time and careful concentration as the aim is to be able to not glue the paper or the need of more than one sheet in order to create the model. Of course, some more elaborate projects may necessitate several sheets of paper, but the aim here is to achieve an intellectual truth in making the model.
- Proceed accordingly by folding, creasing, cutting and turning the sheet of paper around so that the object slowly emerges.
- Make any necessary adjustments to the model that provide better readability, always with an eye on interpreting what is accomplished and adding new elements to enhance the idea.
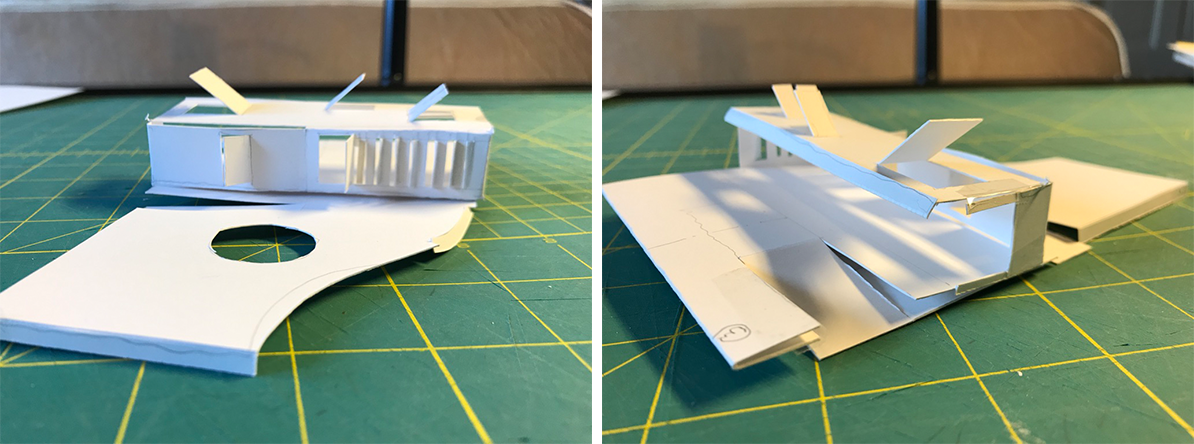 Image 6: entrance and back view (author’s model based on a student’s project)
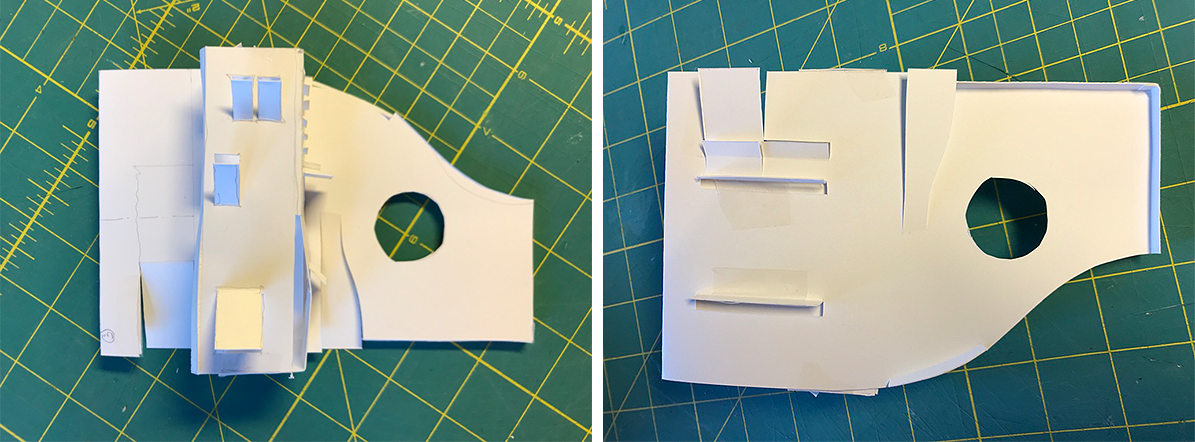 Image 7: arial and underside view (author’s model based on a student’s project)
Additional blogs of interest
Architectural sketching and how do I sketch
The importance of sketching for architects, Part 1
Some thoughts on sketching by hand
Sketching on a field trip, Part 1
Sketching on a field trip, Part 2
Issues about sketching, Part 1
Sketching -an iterative process, Part 2
Sketching -an iterative process, Part 1
Architectural Education: What issues does one encounter when sketching?
Why Model Sketching? Part 5
Why Model Sketching? Part 4
Why Model Sketching? Part 3
Why Model Sketching? Part 2
Why Model Sketching? Part 1